Wednesday, November 28, 2012

Amanda Lawford Nutcracker Santa #1


I've started a new Amanda Lawford Santa; the theme of this guy is The Nutcracker.  

He's a handsome fellow and his buddy the big nutcracker is really cute too.  I've been enjoying stitching this piece and it is going faster than I anticipated.He is 15" (38 cm) tall and is painted on 18 mesh mono canvas.  I mounted him on the mini stretcher bars because I like the lighter weight of these bars and it needs to be portable; otherwise it will take me years to stitch.  Most of my stitching is done poolside while watching my children at swim team practice or swim meets.  

I recently finished up the Royal Santa and had loads of threads left over from that.  I keep my threads stored in a seven bin covered container so I broke up the Royal Santa threads into those bins.  I then decided I have so many threads (too many) that I would try and stitch this Nutcracker Santa completely from stash.  Of course, once I started pulling threads I realized that I needed a few odds and ends so off to the Needlepointer. I went to buy some soft yellows and greens for the bag.  


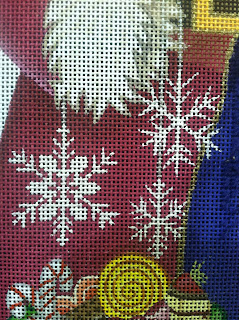
I started stitching the undercoat first.  It is worked in Appleton wool, the leftover purple from Royal Santa's cloak, with one strand.  I took a photograph of the area first, because I know that I was going to bead the snowflakes over the understitching.  


Then I stitched the undercloak, stitching right over the white paint for the snowflakes.  


 After the undercoat I worked the Mouse King's cloak in the same wool, using basketweave and shading the cloak. 


I then moved on to the red coat.  While working on the coat I stitched two of the snowflakes.  I'm embarrassed at how much time I spent on these. My original plan was to stitch all the red, covering the white, then make the snowflakes separately and attach them. I spent four hours making two snowflakes but they just didn't look right. So I took a picture of the area with iPad (which I love to stitch off of, btw) and stitched the red, compensating the stitches around the white.  I then played around with the beading until I got the look I wanted. It is a combination of 8-10 beads on a strand which is then couched down, and individual beaded stitches. I anchored the thread a lot on the back so it is really secure. I'm most pleased with the lazy daisy bead loops. Small joys.


The red coat is stitched in Pavilion Stitch variation, alternating direction.  There are empty threads throughout that I am going to stitch a bead in when I get some at-home stitching time.  The threads are Trio in two shades of red.  I used au ver a soie for the highlights on the sleeves, which are stitched in Diagonal Beaty.  


Next up was the present in the top left corner. It is stitched in Milanese stitch in Vineyard Shimmer S-504 Lollypop for the side and basketweave Rainbow Gallery Treasure Braid 284 for the top.  The ribbon on the side is long satin stitches of Kreinik 014 HL 1/16" ribbon couched with 094 #4 braid.  After the background is stitched I will do laisy daisy stitches at the top of the present.  


I then stitched the faces of the Santa, the Nutcracker, and Clara, as well as the toy Nutcracker.  I used four strands of Au Ver a Soie silk.  I blended colors together to get the shading I wanted.  The eyes were then done with a metallic for a bit of sparkle and the lashes were done with one strand Felicity's Garden in Cast Iron Black.


Best stitching spot so far - 69 Beach North of Kona, Hawaii on Thanksgiving 2012

Next up was Santa's beard.  I used two strands Soie d'Alger Au Ver a Soie silk blended with one strand Medicis Wool.  I started with the grey areas first, using one strand grey silk, one strand white, one strand grey Medicis.  Then I lightened it up by swapping out the grey Medicis for white (001) but keeping one strand grey silk and one strand white.  I then switched to two strands white silk and one strand white Medicis.  I used sort of random long and short stitches, following the curve of the painted grey lowlights, shading, trying not to stitch more than four canvas threads at a time.  After it was completed I went back over it with Rainbow Gallery Wisper in W88 white to cover any canvas-hole-meet-ups that looked odd and add a bit of fluff.  I must also note that rather than doing long and short I stitched basketweave around the Sugar Plum Fairy so she'll stand out a bit when I stitch her.  


Lighting was now dim on the plane so I started the large Nutcracker's hat.  More to come!

Tuesday, November 13, 2012

Melissa Shirley Sugar Plum Fairy and Grandfather finished...


I love them!  I am going to call them my Nutcracker Lollipops.

I originally stitched these over the summer of 2009.  I did the ornament finishing sometime in 2010, but I never got around to having Brad make the stands until this weekend.  I painted them blue and pink layered with gold and accented with ribbons.  There is a closer view on my Melissa Shirley stitching page.  


Monday, November 12, 2012

"Night Before Christmas" by Birds of a Feather


"Night Before Christmas"
by Nancy Davis and Connie O'Brien of Birds of a Feather

This design is from the 1998 Just Cross-Stitch ornament issue magazine.  I stitched it in cotton threads, both solid from DMC and overdyed threads from Weeks Dye Works.  It is stitched on 32 count natural linen from Zweigart.  I used my giant ball-o-blue-yarn for the twisted cording, along with a sparkly blue Kreinik metallic, which I accented with a clear glass bead as I attached it to the ornament.  I stitched this in 2010 and did the finishing in October 2012.  

Birds of a Feather, when I used to collect their patterns, was run by Nancy and Connie.  I stitched several of their pieces and they have really fun designs.  I see on their website now that they no longer have counted cross-stitch designs and do only painted canvases.  

Saturday, November 10, 2012

"Tweet Gift" by Full Circle Designs Finished


"Tweet Gift" by Lynda Watkins of Full Circle Designs

This ornament was a lot of fun to stitch because I used up lots of little bits of overdyed threads I had in my stash.  It is stitched on 32 count linen.  For the finishing I used a textured red velvet for the back and made cording in colors to accent the design.  

I knew I wanted some kind of greenery at the corners.  My original vision was pinecone buttons but I think the holly berries are even more cute.  It has a flat back and flat padded front.  To attach buttons like this, wait until after the ornament is finished and then use a matching thread to couch them onto the ornament.  It is a little difficult as you can't stitch through the matboard but it is more frustrating if you sew them on first and then try and do the finishing because your thread will catch on them over and over.    

Full Circle Design's website is not working at this time but you can see other designs
 they have at ABC Stitch.  

Thursday, November 8, 2012

Blue Dogwood Designs Postcards from Seattle


This is a fun little series of hand-painted canvases from Kay Fite of Blue Dogwood Designs.  Kay lives here in Washington and paints her own canvases.  I stitched them in basketweave using wool threads, overdyed cottons, Kreinik metallics and whatever other little bits of threads I had that I liked. I stitched and finished them in 2012. Finished with silk backs and custom cording.  

Tuesday, November 6, 2012

Beau Geste Ornaments finished.

A whole group here!

These ornaments were designed by Deborah Wilson for Beau Geste.  It was an ornament-of-the-month club from The Needlepointer shop.  There *were* twelve ornaments.  When I did my finishing frenzy I realized that I am missing two.  Hopefully I finished them last year (possible?) and they are packed away with my Christmas stuff.  Alternatively they are hiding somewhere and will hopefully turn up.


These are all finished with white silk dupioni on the back, with a flat hard back.  I padded the front of the ornaments.  I made cording to match each design using a metallic and a cotton fiber, or silk and metallic, etc. I love these!

http://summerlouise.com/albums/stitching/designers/deborahwilson.html has another set of ornaments I stitched from Beau Geste called "Shiny Brites".

Amanda Lawford Royal Santa FINISHED


I can't believe I finished him yesterday - I am thrilled!


(Me thrilled!)

I started this piece in April 2008.  I did take lots of small breaks throughout, most especially when working on the yards and yards of cream background.  

I was working away on Bullion Knots all this last week.  These are worked in two strands of Trio, a silk and merino wool blend.  After I did the entire edge I went back over it an did French Knots for additional shading.  


The edging around the bag was next.  It is stitched in horizontal oblong cross-stitch with one strand Kreinik cord.  It's muted and I think it helps add sparkly without being over powering.

Now for all the fun embellishments!  I rolled the canvas down to the very bottom and started working my way up.  I couched down the gold trim on the cloak front (see overall picture, also shown a little bit in the above picture.  It was couched with silk thread and I plunged the ends into the canvas back with my laying tool.


The stars are stitched in Kreinik 1/16" braid, laid flat with each stitch.  The sterling silver chain was couched on the surface.  


Two more trims for the sleeve - both couched on the surface with the same gold silk I used in the crown.  Also I attached the oval gems.  I realized that the light blue on the sleeves was unstitched so I used a blue Kreinik and did basketweave to fill them in.  


The ribbons from the staff were couched on - the green ribbon, then the gold metallic ribbon, then the hand-dyed red silk ribbon.  


While watching Victoria swim last night I attached the Fleur-de-lis for the staff topper.  There is felt underneath for padding, then the gold, then I couched Gilt Medium Grecian Twist around the design.  


Very last was the jewel.  GeorgiaDee had already glued the shell to Stiff-Stuff.  I used petite gold seed beads and worked peyote stitch around the shell to create the frame.  The stiff stuff is then trimmed back and I couched it to the hat.  There was empty paint around the edging so I filled that in with purple, then added a looped beaded run around the shell at the base.  I love it!


Thanks for sharing this journey with me!  I am probably going to finish him as a stand-up then give him a designated storage box under my bed.  I thought about a wall hanging but Madeline (my 8 year old) pointed out we don't have a good spot to hang him on the wall where he would be displayed at Christmas.  


Sunday, November 4, 2012

" 'Tis Red" by La-D-Da 2010 Ornament Finished


'Tis Red
by Lori Markovic of La-D-Da Designs

This shade of red, DMC 814, is my absolute favorite color. Whenever I see a new type of specialty thread I pick up a skein in this dark red because I know that someday I'll use it.  I may also buy white, but that is not nearly as exciting to me as red.  The thread I used in this is an overdyed silk from Victoria Clayton that I saw and loved and I may have bought an entire hank of it.  (shhhhh)  The ornament is stitched on 36 count white linen from Zweigart.  

La-D-Da has one of my favorite designs that I've never finished.  I still need to mail it to my friend Suzanne because she said she'd finish it for me.  Super nice, yes!  I finished another ornament from Lori some years back as well.  

I embroidered the back with the year on my sewing machine, using a crisp white rayon that really shows up with the red silk dupioni.


The beaded edge of the ornament is created after the ornament is completed by alternating bead colors, in this case a dark clear rose and white, in the string and placing 8-10 beads on a single stitch.  The smaller stitch size forces the beads to curve in an arch away from the edge.  A simple embroidered ribbon bow finishes the top.  

Friday, November 2, 2012

"Amour" by The Collection


"Amour"

by Sallie Luedtke for The Collection

"Word Weights" are fairly simple hand-painted canvases.  They are quick to stitch and make great stash busters.  They have photos of several on their website.  I did the finishing on several of their other weights several years ago.  

I stitched this one for my daughter, Madeline, who likes all things girly and pink.  It is made in Rainbow Gallery Neon Rays for the background and Neon Rays + (sparkles!) for the word.  I finished it with a hot pink silk dupioni flat back, padded front, and custom cording to match the colors in the design.  I then bought sparkling glass hearts at Michael's Crafts and used some nice 4mm Japanese glass cube beads and seed beads I had in my stash for the bottom trim.  Beads and Beyond in Bellevue, Washington is a great bead store for those stash builders.

Larkin Jean Van Horn, a Seattle artist, had a nice little book for beadwork that explains how to do some of the fancier bead trim techniques.  It's nice to be able to refer back to it when my skills have gotten rusty. 


Thursday, November 1, 2012

"Believe" by Madeline Lake Santa Ornament.


"Believe" by Madeline Lake

This little canvas was a screen printed canvas from the 2006 Needlepoint Wall Calendar.  This was such a clever idea - a little screen printed canvas with a laser-cut paper mat and a color photograph.  When the year was over, the canvases could be taken out and stitched.  I wish that they had kept making them.  

This design was a stash buster for me - I used bits of red and green thread, a blue paternayan wool for the background and worked the beard in stem stitch.  The cuff of the hat is turkey work and the scarf has little fringe on the end.  The snowflakes are plastic stickers or beaded stickers that I couched on - I picked them up from Michael's Crafts.  I finished the back in blue velveteen and it is finished flat.  

A fun tip - I bought a large skein of this blue knitting yard at Pacific Fabrics in Everett, Washington several years ago.  It is a smooth nylon blend - label long gone - with shiny and matte threads running through it.  It has been a great blender for all kinds of twisted cording and also is lovely on its own - knitting fiber aisle is a great place to check for twisted cording fiber.   Just stay away from pearl cotton in skein format as it knots terribly.


Wednesday, October 31, 2012

Catherine Coleman "January" Ornament finished.


"January"
by Catherine Coleman

Catherine is a talented charted canvaswork designer.  This piece, called "January", was still available at Stitcher's Paradise at the time of this writing.   I've worked several of her designs and always learn something new as I work each one.  She layers the stitches in a unique way with interesting threads and stitch orientations.  

I finished this ornament with a hard, flat back and a padded front.  The model was finished as a kissing ball ornament with a styrofoam form inside but I find that those take up a lot of space in storage.  Since I need more space for more ornaments I like to finish most of mine flat.  However, while I was stretching the canvas around the matboard form the blending filament used for the beading popped and *pop* *pop* *pop* off came a bunch of beads.  I rebeaded it with a stronger thread but note to self - blending filament for beading does not work if the piece is going to need to be blocked or stretched later.  Had I matched the model and finished it as a kissing ball it would not have been an issue.  Oops!  


Tuesday, October 30, 2012

Shelly Tribbey "Snowman" Ornament finished.


"Snowman"
by Shelly Tribbey

Shelly does some of the cutest needlepoint ornaments I've seen.  Hand-painted canvases are super-fun to stitch because there is no chart - you just pick threads you like and get stitching.  I stitched this canvas in November/December 2006 and did the finishing in October 2012.  

The scarf and hat are Rainbow Gallery Fuzzy Stuff and the ornament is backed in blue silk dupioni.   I made the twisted cording from red and white cotton thread and blue Fuzzy Stuff.  I love the velvet rick-rack ribbon  bow from Pacific Fabrics in Bellevue, Washington.  I wanted to accent the hat and pick up the red in the twisted cording I made and I think the waviness of the ribbon suits the piece better than a straight ribbon would have done.  

Monday, October 29, 2012

"The Gift" by Darlene O'Steen of Needle's Prayse


"The Gift"
by Darlene O'Steen of The Needle's Prayse

This ornament was published in the 1998 Just Cross-Stitch Ornament issue.  This magazine became very hard to find by the year 2000 and still usually sells at a premium on the internet.  Darlene wrote an incredible book called "The Proper Stitch" which includes two samplers: "Our English Heritage Sampler" and "The Proper Stitch Sampler".  I made her Cranberry Sampler in 2007 and plan on making the other two someday as well.  

I finished the ornament in October 2012 with a silk dupioni back and cotton twisted cording.  I may keep the bows or remove them later... I tend to be very traditional in my own finishing and am trying to get to like bows.  

Sorry for the water drop in the photo - it was raining here in Washington when I took the picture!

Sunday, October 28, 2012

Teresa Wentzler's "Father Winter Ornament" finished.


"Father Winter Ornament" by Teresa Wentzler

I have always been a huge Teresa Wenztler fan.  I've stitched several of her designs over the years and enjoyed them immensely.  Her sense of color and balance are masterful.  Plus, she's super nice and incredibly generous with her craft.  This pattern is free on her website.  You can see her other wonderful pieces on her website as well.  

I originally stitched this ornament in July 2006 on 28 count green evenweave fabric using DMC cotton threads and Mill Hill seed beads.  I finished it in October 2012 with a silk dupioni backing and white trim with pink seed beads.  I love the beads!  

Wednesday, October 17, 2012

Royal Santa by Amanda Lawford #12

In which I learn I shouldn't always follow the stitch guide.

I must first note, I have loved this stitch guide.  So many fun stitches and threads and it is turning out beautifully.


The feathers are worked in basketweave with three strands of Anchor cotton floss.  I blended the colors a bit, being cognizant that they are going to get stitched over with a long fiber.  The stitch guide said to stitch the Bernat Boa in the last bit... a long fiber couched diagonally.  Well, when I needed to basketweave the edges of the feather I needed to pin back the Boa fiber.  Poor planning on my part, although it turned out well in the end.  The edges of the feather were then worked in wrapped stem stitch, which I find easier to curve than wrapped backstitch.


The white fiber is was then couched along the center of each feather vein.  Love it!


My thread minder.  


Plume on the cap was done the same as the green.

I'm now working on the purple cap.  I couldn't actually find *anything* about that in the stitch guide so I'm working it in the same nobuko variation as the sleeve caps on the robe.  Next up are the eyes and then the cap brim.


Monday, October 8, 2012

Royal Santa by Amanda Lawford #11


Today I finished up the "fur" on the robe cuff and color.  It is stitched by couching Bernat Boa knitting fiber (color 81013) onto the canvas in long diagonal rows using cotton floss.  I used about 35 yards of the Boa fiber.  I've given the rows a little brushing and after all of the canvas is stitched and finished I will probably trim it up a bit, particularly around the fleur-de-lis.  

I don't know why, but the canvas has a long vertical crease in it.  It's always been kept on long stretcher bars but perhaps it was folded before it came to me?  When it's completed I will try hitting it with some steam during the blocking and hope that makes it come out.  

He's certainly more fun to work on now that I'm not stitching all white background all the time.

Sunday, September 23, 2012

Cathedral Windows - Hubble #1

I love it!


People have been asking me how much time this has taken me to stitch.  I don't usually keep track of how much time I work on something because I enjoy the process more than the end product (hence the piles of finished quilts and bins of finished needlework around here) so it is hard for me to give a true answer.  I did start this project in January of this year, although the planning for it started last year.  It took me about six weeks of solid stitching to get 1/6 the way through.  

I then had a series of short breaks where I made a double-sided quilt for Brad, did the actual quilt work on the Home Sweet Home quilt #1, spent a week on the backing and quilted the Dresden Plates quilt, and lastly finished the top of Home Sweet Home quilt #2, which hasn't been photographed yet because I need to make a backing.  Also in there was my long trip up to Kelowna where I finished up UFO's (unfinished objects that have been around for a long, long time) but then I spent hours and hours and hours working on this.  The quilt is 58" square and each little square is 3" across.  

All worth it, in my opinion.  It is hand folded, hand pieced, hand appliqued, and hand bound.  Each little prairie point was place by hand (my how I hate math).  I stopped counting the yards of black fabric and just bought two yards more each time I went in.  All of the black fabrics were designed by Faye Burgos from Marcus Brothers.  The colored fabrics are 99% Kaffe Fassett fabrics, some leftover from Lollypop Trees and many bought specifically for this quilt to get the right shade of fabric.  


My inspiration for this quilt was the images coming from the Hubble telescope.  It's amazing to me that with our eyes, we see so little.  When you layer images of stars that the Hubble can see, it's layers and layers of color.  Each star is a different color based on the age of the star.  Truly breathtaking.  


Some comments from facebook:

Kamila Vm Kamila It´s breathtaking !

Anna Margrét Árnadóttir Summer!!! This is one of the all time most wonderful quilts ever 
I have seen . . . thought first that all you fabrics were batiks . . but up close I saw that "Hubble #1" had found all the best fabrics in the Universe ♥ Congratulations on a magnificent quilt!

Anne Andersen Really beautiful. Must have taken you forever. :-))

Chantal Lynch Absolutely wonderful! Love the inspiration.

Margaret Jackson Graeff That is incredible! Just gorgeous!

Christina Belding Awesome!!

Sandra Howell Wow! Breathtaking is an understatement. I'm not a fan of creating a Cwindow quilt, but my hat's off to those you make them.

Bettina Trapp This is amazing!

Cathy Hurst Just had a look at an enlarged photo. Your quilt is absolutely gorgeous and a massive amount of work. Well done!